Local LLM on a Mac - Part 2 Modelfiles

Update (September 2026): Part 3 revises the sampling parameters below. If you're reading the series in order, follow this article as written — Part 3 explains what changes and why. See the note at the end for the short version.
In the first article of this series, I installed Ollama on a Mac. The goal was to run an open source model locally, so that routine coding work does not need a cloud API. I also spent zero time picking and configuring the model. I simply said, "Hey Claude, give me a good open source coding model that can run on my machine."
One of the most common mistakes with local LLMs is treating every use case the same: the same model and the same configuration for everything. A coding assistant and a creative writing tool have very different requirements. To use Ollama well, you need to match your configuration to the task.
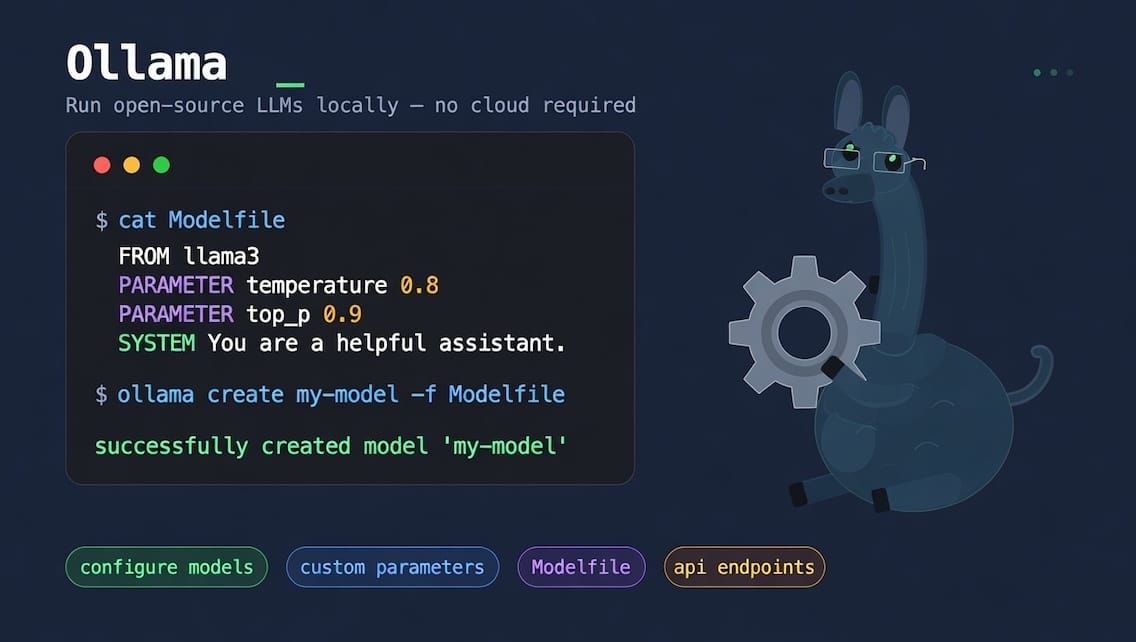
The tool that Ollama gives us for this is the Modelfile. A Modelfile is a simple configuration file that describes how you want a model to behave. From it, Ollama builds a variant: a new model with its own name that reuses the original model's weights and adds your configuration on top. The weights themselves never change. Think of it like a Dockerfile, but for LLM configurations.
Thinking About Use Cases First
Before picking a model or writing a single line of configuration, it helps to be clear about what you're building. Some categories are:
- Coding: code generation, completion, debugging, explanation
- General chat: Q&A, summarization, general assistance
- Creative writing: storytelling, brainstorming, open-ended generation
- Document/data processing: long document analysis, extraction, structured output
The use case drives two decisions: which base model to start with, and how to tune its parameters. Getting both right improves output quality. For this series, I already know my use case. I want a model that helps me write code. This article builds that one. The same process works for the other three.
Choosing the Right Base Model
Models differ in ways that matter for your use case, and Ollama can host a lot of them. Three things to consider:
- Parameter count: larger models (13B, 30B, 70B) are more capable but slower and more memory intensive. Smaller models (1.5B, 7B) are faster and run well on modest hardware.
- Quantization: models are often available at different quantization levels (Q4, Q5, Q8). The number is the bit width used for each parameter. A lower bit width produces a smaller file and faster inference, and it costs some output quality. The first article showed how this decides what fits on your hardware. If you want the full theory, Hugging Face publishes a detailed guide to quantization.
- Specialization: some models are fine-tuned for specific tasks like coding or instruction following.
The full model library available to Ollama is at ollama.com/library. Each model page shows the available tags. A tag names one specific build of that model: its parameter count, its quantization level, and sometimes a specialization such as an instruction-tuned build.
It is important to test different models. You will not know whether a model suits your work until you run your own tasks through it, so treat any recommendation, including mine, as a starting point.
For this series, I am staying with my original coding model, qwen3-coder:30b.
Understanding the Modelfile
Once you have picked and pulled a model, you need to configure it for how you plan to use it. This is the purpose of the Modelfile. A Modelfile is a plain text file (no extension needed) that defines a model configuration. The structure is straightforward:
FROM <base-model>

SYSTEM """<system prompt>"""

PARAMETER <key> <value>
A one-line system prompt can use a single pair of quotes. A prompt that runs across several lines needs the triple quotes shown above, so use them from the start.
A Modelfile supports more instructions than these three, but these are all we need for this series:
- FROM: the base model to build on (required)
- SYSTEM: the system prompt applied to every conversation. It sets the role the model plays, the rules it follows, and the shape of its answers. You write it once instead of repeating it in every prompt.
- PARAMETER: model parameters that control generation behavior, such as
temperatureandnum_ctx. The table further down defines each one we use.
The first two are straightforward. FROM is the model we want to use. In this case it is the qwen3-coder:30b model. So our FROM setting would look like this:
FROM qwen3-coder:30b
The second setting we are interested in is the SYSTEM prompt. For this series it is simple. I want to build a sample project to test open source models, and I want to write it in TypeScript. Here is a sample system prompt:
SYSTEM """You are a senior TypeScript engineer. You write production-quality code for modern TypeScript projects.

Guidelines:

- Target modern TypeScript (5.x) with strict mode enabled. Never use `any` — prefer `unknown`, generics, or a precise type. Avoid non-null assertions (`!`) unless the invariant is obvious.

- Prefer types and interfaces that make invalid states unrepresentable: discriminated unions, literal types, `readonly`, and `satisfies` where it helps inference.

- Use ES modules, async/await, and standard Node or Web APIs. Don't reach for a dependency when the standard library will do.

- Handle errors explicitly. Don't swallow them in empty catch blocks.

- Match the conventions, style, and libraries already present in code the user shows you rather than imposing your own.

Response style:

- Lead with the code. Keep prose short and only explain non-obvious decisions.

- Give complete, runnable code — no `// ... rest of implementation` placeholders.

- If the request is ambiguous in a way that changes the design, ask one clarifying question instead of guessing.

- If you're unsure whether an API exists or behaves as described, say so rather than inventing it.
"""
Note: There is nothing magical about this prompt. It has three parts, and you can reuse that shape for any language or task:
- A role. One sentence that says who the model is acting as. Here it is "a senior TypeScript engineer."
- Guidelines. The rules you would otherwise repeat in every prompt: which language features to use, which to avoid, how to handle errors.
- Response style. What a good answer looks like: how long, how much explanation, and what to do when the request is unclear.
The fastest way to write the guidelines is to collect the corrections you already make by hand. Every time you tell a model "don't use any" or "give me the whole file, not a placeholder," you have found a line for your system prompt.
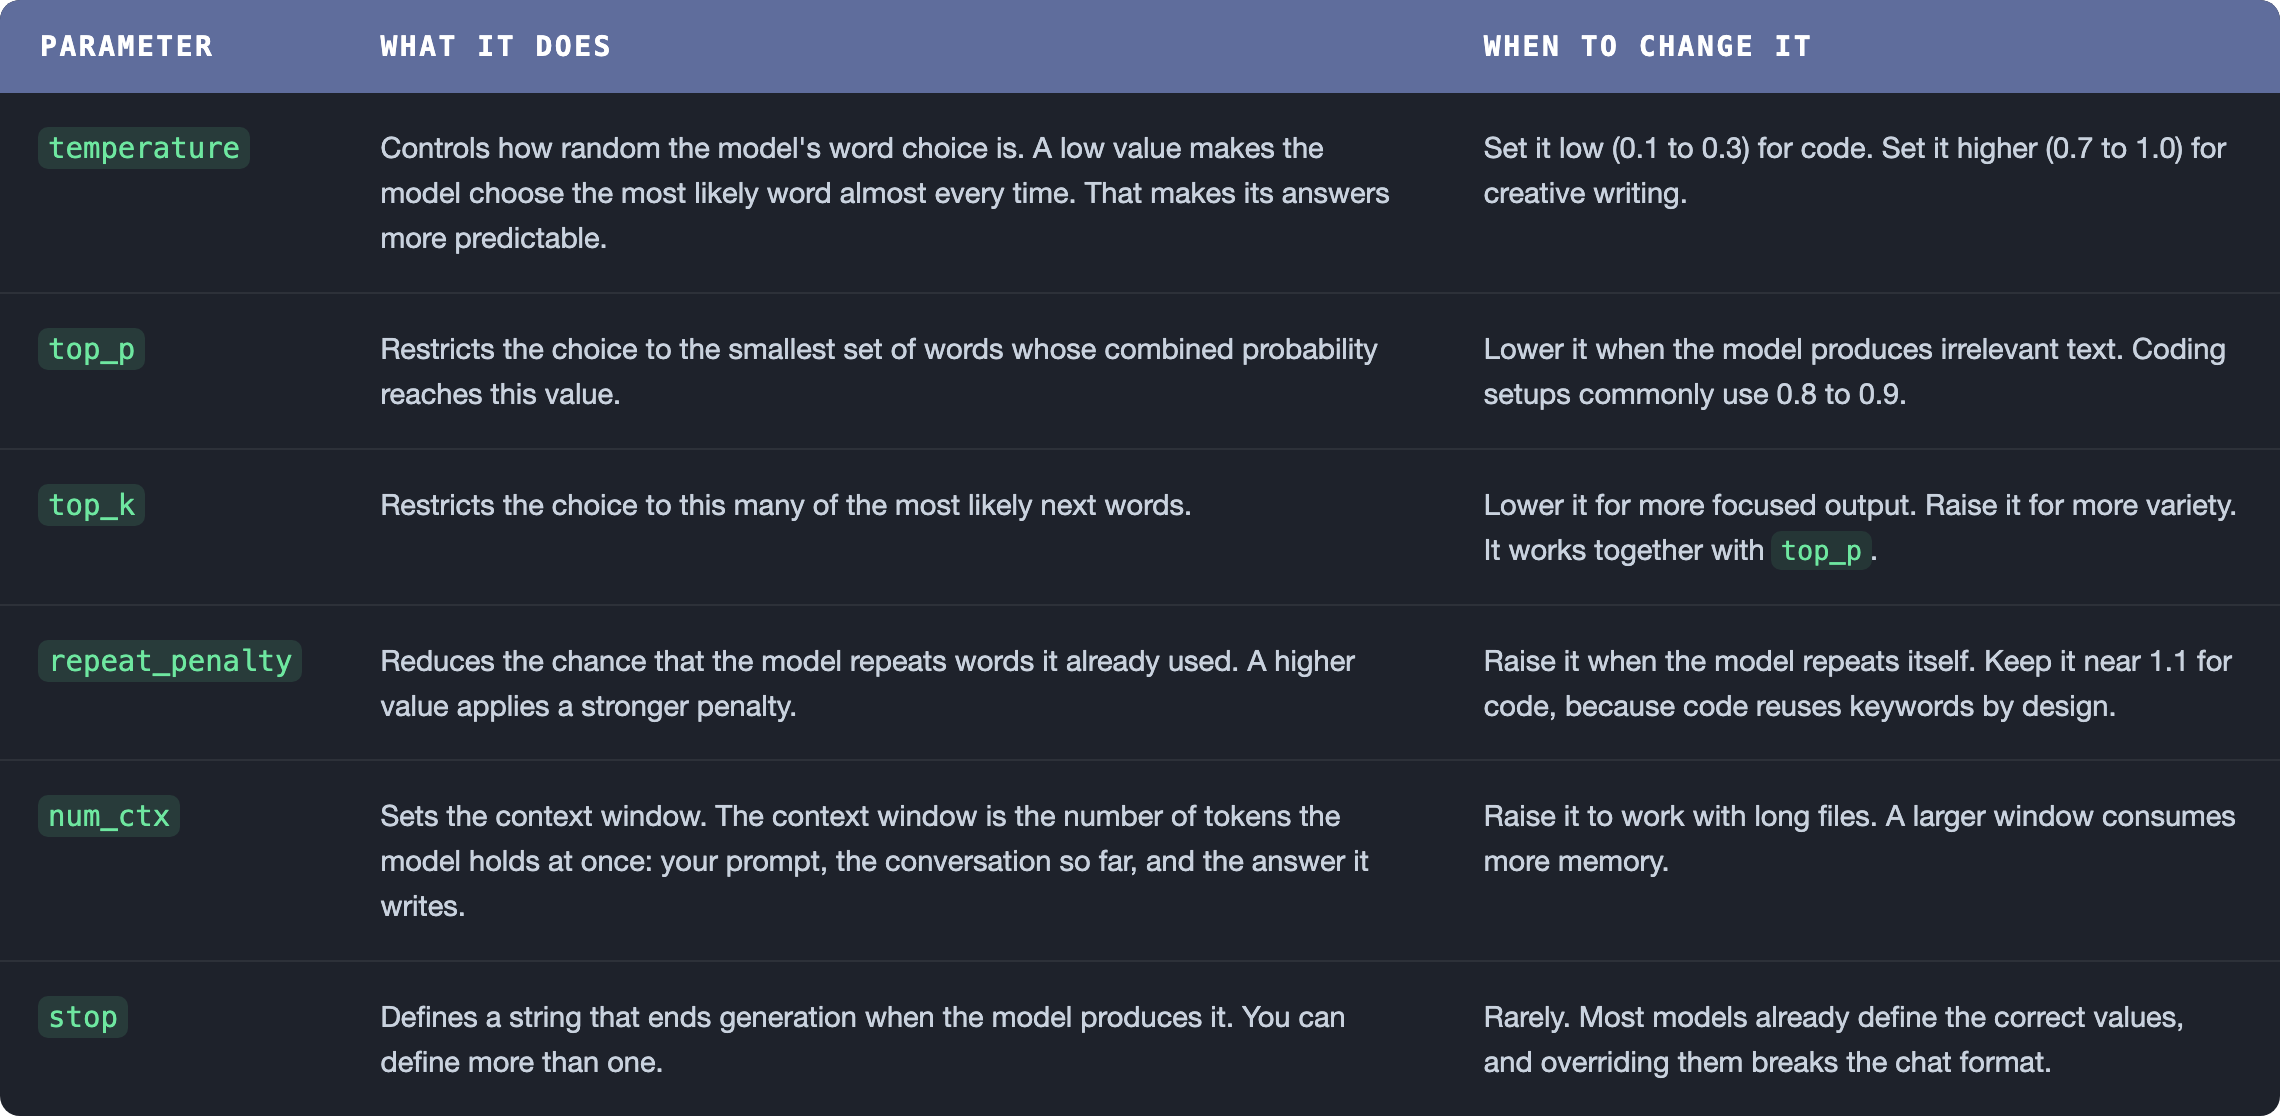
So, now we have defined the FROM and SYSTEM Modelfile properties. The next property we need to talk about is PARAMETER. This is where we do our actual configuration tuning of the model. The table below defines the parameters we are going to use. It is not the full list. Ollama's Modelfile reference documents every parameter you can set.
Tuning Parameters to Create a Coding Assistant
A coding assistant needs precision more than creativity. When you ask for a function, there is usually one correct answer and many wrong ones. Our parameters should push the model toward the correct answer and keep it from wandering.
This also matches the goal we set in the previous article. We are not replacing Anthropic's models. We want the local model to handle the routine work: boilerplate, small refactors, test scaffolding, and explanations of existing code. That work rewards a model that is consistent and predictable.
Start From What the Base Model Already Sets
Most models ship with their own parameter values. Look at those values before you override anything:
ollama show qwen3-coder:30b
For qwen3-coder:30b, part of the output looks like this:
  Parameters
    top_p             0.8
    repeat_penalty    1.05
    stop              "<|im_start|>"
    stop              "<|im_end|>"
    stop              "<|endoftext|>"
    temperature       0.7
    top_k             20
The people who published the model chose these values. They are a reasonable starting point. Our job is to change the few that do not match our use case, not to replace the whole set.
Three of the six parameters from the table need no change:
top_kis already 20. That is a small set of candidate words, which is what we want for code.top_pis already 0.8. Together with the low temperature we set below, that is narrow enough. Raising it would loosen the model in exactly the place we want it tight.stopalready defines the three tokens this model uses to end a turn. If we define our own, we break the chat format and the model will not stop correctly.
Choosing the Other Values
That leaves three parameters to set:
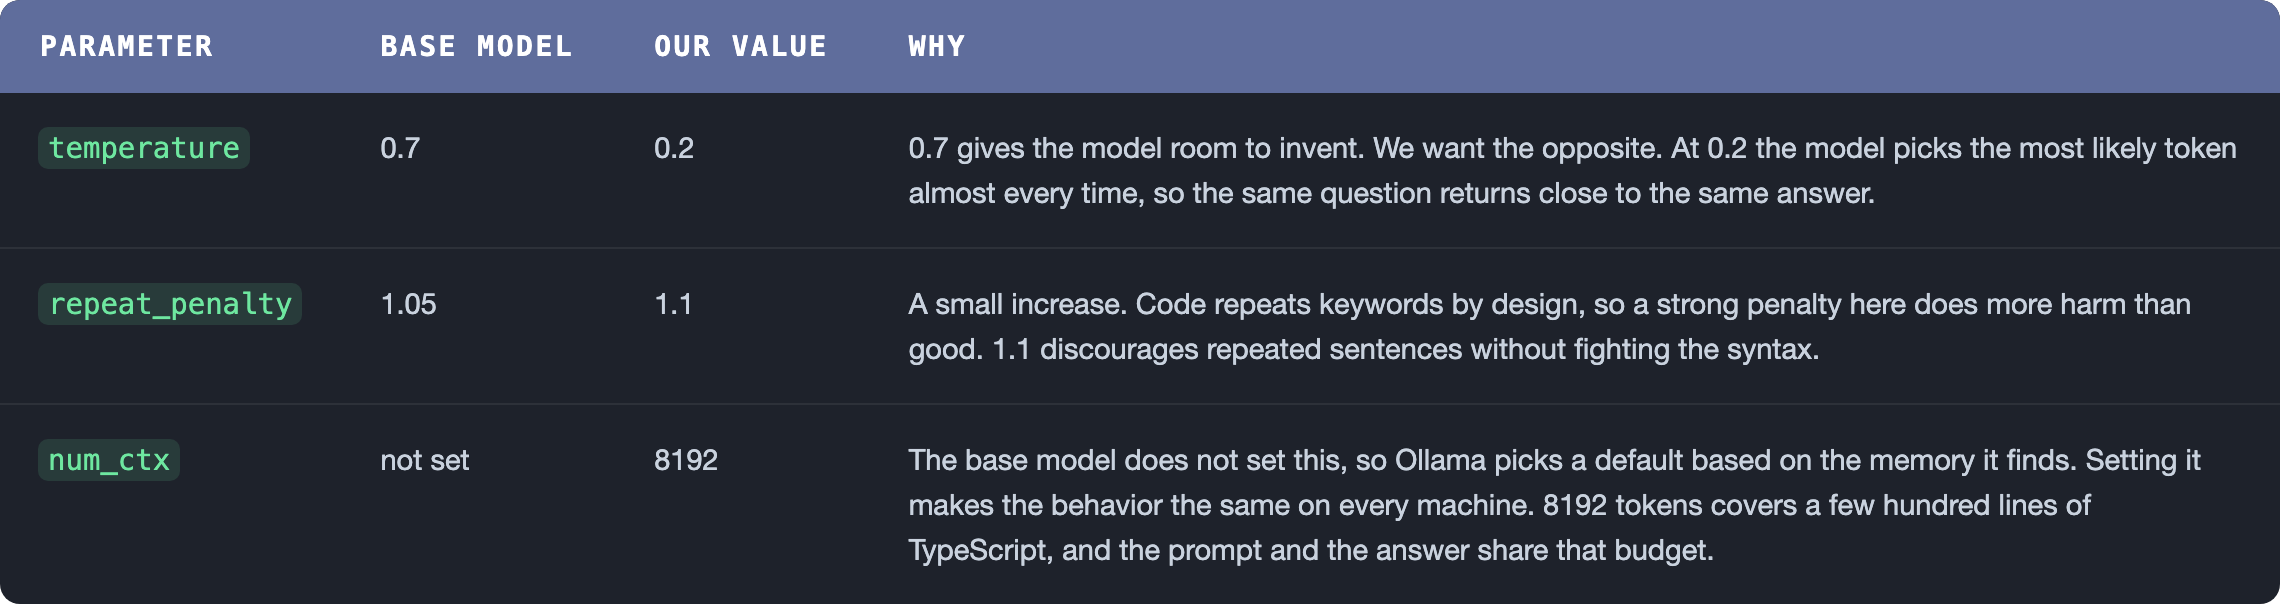
Note: Every number here is a starting point, not a rule. Try 0.1 and 0.3 for temperature and compare the results on your own code. The section on testing later in this article covers what to look for.
The Complete Modelfile
Here is the finished file. The SYSTEM prompt is shortened to a placeholder here so the parameters stay readable:
FROM qwen3-coder:30b

SYSTEM """<paste the full prompt from the previous section here>"""

PARAMETER temperature 0.2
PARAMETER num_ctx 8192
PARAMETER repeat_penalty 1.1
Three lines of configuration. The other three parameters stay at the values the base model already provides.
Replace the placeholder with the whole prompt before you build. Ollama does not check the text, so a Modelfile that still contains the placeholder builds without an error and then sends that line to the model in every conversation.
A note on num_ctx and memory: the context window is the setting most likely to cause trouble on a laptop. qwen3-coder:30b supports a context window of 262,144 tokens, but every token you enable costs memory. Ollama reserves that memory when it loads the model, whether or not you use it. On Apple Silicon that memory comes out of the same pool as macOS and every other application you have open. Raise num_ctx when a task needs it, then watch load time and memory use to see what the change cost you.
Building the Model
A Modelfile on disk does nothing on its own. You have to build it into a model that Ollama can run. Save the file above as Modelfile.coding, then run this command from the same directory:
ollama create coding-assistant -f Modelfile.coding
The create command reads the Modelfile, applies your settings to the base model, and registers the result under the name you give it. Confirm the new model exists:
ollama list
You should see coding-assistant in the list alongside qwen3-coder:30b.
NAME                       ID              SIZE     MODIFIED
coding-assistant:latest    a026b5b509e1    18 GB    Less than a minute ago
qwen3-coder:30b            06c1097efce0    18 GB    7 weeks ago
Ollama adds the :latest tag because we did not give the model one.
Testing Your Configurations
Once you've built a model, test it interactively before wiring it into anything:
ollama run coding-assistant
Things to look for:
- Does it follow the system prompt's tone and constraints?
- Is the output too verbose or too terse?
- Does it repeat itself? (adjust
repeat_penalty) - Is it too cautious or too random? (adjust
temperature)
Iterate on the Modelfile and rebuild with ollama create until it feels right.
Building a Library of Configurations
You now have one model that works. Building the second one is mostly copying the first. Once you have more than one Modelfile, it's worth being intentional about how you manage them.
Naming Conventions
Keep model names descriptive. We named ours coding-assistant, and its Modelfile Modelfile.coding, so the pair is easy to match. When you add configurations for the other use cases, use the same shape: a short name that says what the model is for, and a Modelfile named to match.
Version Control
Keep your Modelfiles in a repository, next to the code they help you write. A Modelfile is plain text, so it diffs like source code. When you lower temperature and the output gets worse, the diff shows you exactly what changed. Storing them with a project also means anyone who clones it can run ollama create and get the same model you have.
A Note from Part 3
Part 3 of this series puts a coding harness in front of the model, and one of the things it revises is the sampling configuration above.
The short version: Part 3 introduces min_p, which keeps any token whose probability is at least a fraction of the most likely token's probability. Once min_p is doing that job, top_k and top_p are redundant. Part 3's Modelfile disables top_k and opens top_p up to 0.95 as a backstop. It also drops repeat_penalty from 1.1 to 1.05, for the same reason given here, applied harder inside a tool loop.
None of that changes the argument in this article. The Modelfile here is correct for interactive chat use, which is what this article builds. Part 3's changes are the ones you want when the model is running inside a harness that reads files and calls tools. Read this article as written, then decide in Part 3 whether to switch.
Conclusion
With a purpose-built Modelfile, you're no longer working with a one-size-fits-all setup. Your coding assistant is tuned for the job: the right base model, the right system prompt, the right parameters. The same process works for any other use case you want to build.
In the next article, we'll put an open source coding harness in front of Ollama. A harness sits between you and the model. It takes a request like "add tests to this file," gathers the files the model needs to see, and sends them to the model as one prompt. The model replies, often by asking to read another file or to run a command. The harness performs that step, returns the result, and repeats until the work is done. It also gives you one place to route requests across the different model configurations you build.