Local LLM on a Mac - Part 1 Ollama

I was talking to a developer friend the other day. We were discussing how each of us uses Claude Code...just sharing our development processes. I asked him which plan he used. He said his company gives him a budget of $3000.00 US per month. I thought, "Holy shit! That's a lot." I have the Max plan and really have not had any issues with it, but I have had some coworkers say they have been running out of tokens recently. And then this morning I read that company estimated AI budgets are being greatly underestimated. The adoption of cloud-based AI is exceeding expectations and it's getting more and more expensive for companies to keep up.
It makes sense, but I just had not thought about it. My next thought was, "What are we going to do if our subscriptions become unaffordable?" It made me think about taking my Lewis-and-Clarking into a more local LLM dev environment more seriously.
I have a MacBook Pro M3 with 36 GB of RAM that I don't use very often and I have some time on my hands. I thought to myself, "I want to see if I can swap out my Claude Code setup for open-source tools. I'd still lean on Anthropic models, but I'm curious whether some local open-source models could pick up part of the load, burn fewer Anthropic tokens, and save me some money."
The goal of this series is to build out a local LLM development environment on Apple Silicon. In this first article, we get that environment up and running with an open source model and discuss how the local LLM runner is managed. Later articles build on it.
Architecture
The first thing we need to do is figure out what this local environment would actually look like. We need an LLM runner to host the models and expose them to remote clients. And we need it all to be free and open source.
I am splitting the local dev environment across two machines:
- The AI Machine. This is the MacBook Pro M3 that sits idle most of the time. It runs the LLM runner and holds the model in memory. Its only job is to answer requests. I refer to it as the AI Machine throughout this article.
- The Development Machine. This is the Mac I actually write code on. It runs my editor and my AI coding tools. It does not run the model. When it needs the model, it sends a request across the network to the AI Machine. I refer to it as the Development Machine throughout this article.
Why two machines? A 30B parameter model takes up a lot of memory while it is loaded, and serving requests uses the GPU. I would rather not give that load to the laptop I am editing and building on. Offloading the model to a second machine keeps my development machine responsive, and it lets a model run on hardware that would otherwise sit unused. It also mirrors how a cloud-hosted LLM setup works: one machine (or a server) hosts the model, and many clients connect to it.
That is the whole reason a chunk of this article is about networking. The model lives on one machine, the tools live on another, so the AI Machine has to be reachable across the local area network (LAN). If you only have one Mac, you can still follow along. The AI Machine and the Development Machine are simply the same computer, and the requests never leave it.
The rest of this article sets up the AI Machine: install the runner, pull a model, and expose it on the network so the Development Machine can reach it.
LLM Runner
Given that we want the LLM runner to be open source and work on a Mac, our options are limited to mlx-lm (Apple's own Python library) and Ollama. I chose Ollama because it has been around longer and has more documentation available. I will look at Apple's mlx-lm in the future.
Note: I thought about choosing LM Studio, but LM Studio is not open source. LM Studio is free to use (including for work) but proprietary. You can't audit the code or modify it for your organization's needs.
The Model
Next, I needed a good open source coding model that could run on my hardware. I won't pretend I did extensive research here. I asked Claude, and it recommended Qwen3-Coder 30B.
Setting up Ollama
Let's go ahead and get this set up. First let's install Ollama. The following steps walk you through installing and starting Ollama.
Step 1 — Install Ollama
Install Ollama using Homebrew:
brew install ollama
There are many ways to install Ollama. Because I am using a Mac, I am using Homebrew. Homebrew also makes it simple to run Ollama as a service.
Once Ollama is installed, start it up using the following command:
brew services start ollama
When Ollama is up and running, you can tail its logs by executing the following:
tail -f $(brew --prefix)/var/log/ollama.log
You really don't need to tail the log files. It just lets you see things start up and watch Ollama respond as you issue it commands. Watching the log files really gives you insight into what is going on with Ollama as you are using it.
Configuring Ollama with Environment Variables
We will tune a few of Ollama's settings as we go. Ollama is configured through environment variables, and because we installed it as a Homebrew service, we set those variables in the service's launchd property list (the plist), inside its EnvironmentVariables dictionary. I am explaining the mechanics here, once, so the later steps can just tell you which variable to add.
You could instead use launchctl setenv, but those values do not survive a reboot. You would have to set them again on every login. The plist is a file, so the values stick.
First, find the plist. Homebrew stores it in the Cellar under the installed version, so rather than hardcode a version number, let the shell find it:
ls "$(brew --prefix)"/Cellar/ollama/*/homebrew.mxcl.ollama.plist
Open that file in a text editor:
open -e "$(brew --prefix)"/Cellar/ollama/*/homebrew.mxcl.ollama.plist
Inside, find the EnvironmentVariables dictionary (or add one if it is not there). Every variable is a <key> followed by a <string> value. The keys we add in the later steps all go inside this one <dict>:
<key>EnvironmentVariables</key>
<dict>
    <!-- env-var keys go here -->
</dict>
After any change to the plist, restart the service so it reads the new values:
brew services restart ollama
By the end of this article you will have added three variables, and the dictionary will look similar to this:
<key>EnvironmentVariables</key>
<dict>
    <key>OLLAMA_KEEP_ALIVE</key>
    <string>10m</string>
    <key>OLLAMA_HOST</key>
    <string>0.0.0.0:11434</string>
    <key>OLLAMA_USE_MLX</key>
    <string>1</string>
</dict>
Important — back up your changes. When you run brew upgrade ollama, Homebrew installs a new Cellar directory with a fresh plist that does not contain your edits. Keep a copy of your EnvironmentVariables block somewhere safe, like a note or a gist. After upgrading, paste it back into the new plist and restart the service.
Step 2 — Pull the Model
Once you have Ollama installed, you need to tell it which model you want to use. Execute the following command:
ollama pull qwen3-coder:30b
This downloads the model, but does not load the model into memory. When the model is downloaded completely, you will see a success message letting you know you are good to go.
Note: This is a fairly large file and can take some time depending upon your network speeds.
A note on memory: "30B" describes the parameter count, not the download or memory size. What actually fits on your hardware depends on quantization: how many bits represent each parameter. The qwen3-coder:30b tag pulls a 4-bit build (Q4_K_M) of roughly 18 GB, which is the only reason it runs on a 36 GB Mac. The full-precision version would need far more.
On Apple Silicon the RAM is unified: macOS, your other apps, the model weights, and the model's working memory all share the same pool. So the question is not "does an 18 GB model fit in 36 GB?" but "does the model plus its context cache plus macOS plus everything else fit?" In practice that lands you at a tight-but-workable 22–27 GB during a session. I would treat 32 GB as the practical floor for this model; on a 16 GB Mac it will not run usefully. If you have less memory, pull a smaller model or a more aggressive quantization.
Step 3 — Test the Model Locally
OK. Ollama is installed and qwen3-coder:30b is downloaded. To load and run the model, execute the following command:
ollama run qwen3-coder:30b
Note: When you first start a model using the run command, the model has to be loaded before it can respond. This can take a few seconds depending upon the size of the model.
Also, the model will not stay in memory forever. The default length of time the model will stay loaded (without being used) is 5 minutes. If you want to change that default, set the OLLAMA_KEEP_ALIVE environment variable, which accepts values like:
10m— 10 minutes1h— 1 hour-1— keep loaded indefinitely0— unload immediately after each request
Add it to the EnvironmentVariables dictionary in the plist (see Configuring Ollama with Environment Variables):
<key>OLLAMA_KEEP_ALIVE</key>
<string>10m</string>
Or if you have a dedicated machine to run Ollama on, like I have here, use the value -1 for the OLLAMA_KEEP_ALIVE value to keep the model loaded indefinitely.
<key>OLLAMA_KEEP_ALIVE</key>
<string>-1</string>
Then restart the service and load the model:
brew services restart ollama
ollama run qwen3-coder:30b
When the model is up and running, you will see the Ollama CLI prompt telling you to send it a message:
>>> Send a message (/? for help)
It's time to kick the proverbial tires. Try a quick prompt and see what you get:
Write a Swift async networking client.
On my machine, it took only seconds and then the response began to stream in, a complete Swift async networking client. That's not too bad.
What struck me was the latency. The model is running on the machine in front of me, so there is no network round-trip and no cloud queue. The first tokens come back almost immediately. That is the real win here: a complete, open-source, free environment hosting a quality coding model on your own hardware, answering with no round-trip to a server you do not control...pretty cool.
Go ahead and type the bye command to exit out of the CLI:
>>> /bye
Connecting the AI Machine to the LAN
Now let's make Ollama reachable across the LAN. The following steps walk you through exposing the server, verifying it locally, finding the AI Machine's IP, and confirming the connection from the Development Machine.
Step 1 — Configure Ollama for LAN Access
The next thing we need to do is make sure our Ollama instance is accessible from other machines on your network. By default Ollama only listens on 127.0.0.1, which means only your local machine can reach it.
We control this with the OLLAMA_HOST environment variable. Add it to the EnvironmentVariables dictionary in the plist (see Configuring Ollama with Environment Variables):
<key>OLLAMA_HOST</key>
<string>0.0.0.0:11434</string>
Setting OLLAMA_HOST to 0.0.0.0 tells Ollama to listen on all network interfaces, which is what allows other machines on your network to reach it. The :11434 is Ollama's default port.
Now restart the service so it reads the new value:
brew services restart ollama
A note on security: Binding to 0.0.0.0 exposes Ollama to every machine on your network, and Ollama has no authentication of its own. Anyone who can reach the AI Machine can send it requests. Only do this on a network you trust: a home or office LAN behind a firewall, not a public or shared network.
Before going any further, confirm the service is answering on the AI Machine itself. Run this curl command locally, on the AI Machine:
curl http://127.0.0.1:11434/api/tags
You should get back a JSON response listing the models you have pulled. If you see that, Ollama is running and responding. We will run this same request from another machine in Step 3.
Step 2 — Get the IP Address of your Ollama Instance
Next, we need the IP address of the AI Machine. Run this command on the AI Machine:
ipconfig getifaddr en0
This will give you the IP address that other machines on your network can use to connect to the Ollama server.
Example output:
10.0.0.123
Note: en0 is usually the primary interface, but it is not guaranteed. On some Macs Wi-Fi is en1 and en0 is Ethernet. If the command returns nothing, your active connection is on a different interface. Try ipconfig getifaddr en1, or run ifconfig to see every interface and find the one with your LAN address.
Be sure to keep this IP address for later.
Step 3 — Verify Remote Connectivity
And finally, from a different machine, run the following curl command with the IP address from step 2 to make sure you can make requests to the AI Machine. This command will list all of the models currently available to this Ollama instance.
curl http://10.0.0.123:11434/api/tags
Replace the IP address with the actual address you received when you ran the ipconfig command earlier. If everything went according to plan, you should see a response similar to the one you saw when you ran the curl command locally on the AI Machine.
If this fails:
- Verify both machines are on the same network
- Check macOS firewall settings
- Ensure Ollama is listening on 0.0.0.0
- Confirm the IP address is correct
Now, see how we can send a prompt to the remote AI Machine. To do this, let's send the same prompt we used earlier but this time let's use a curl command. Run the following curl command:
curl http://10.0.0.123:11434/api/generate \
  -H "Content-Type: application/json" \
  -d '{ "model": "qwen3-coder:30b", "prompt": "Write a Swift async networking client.", "stream": true }'
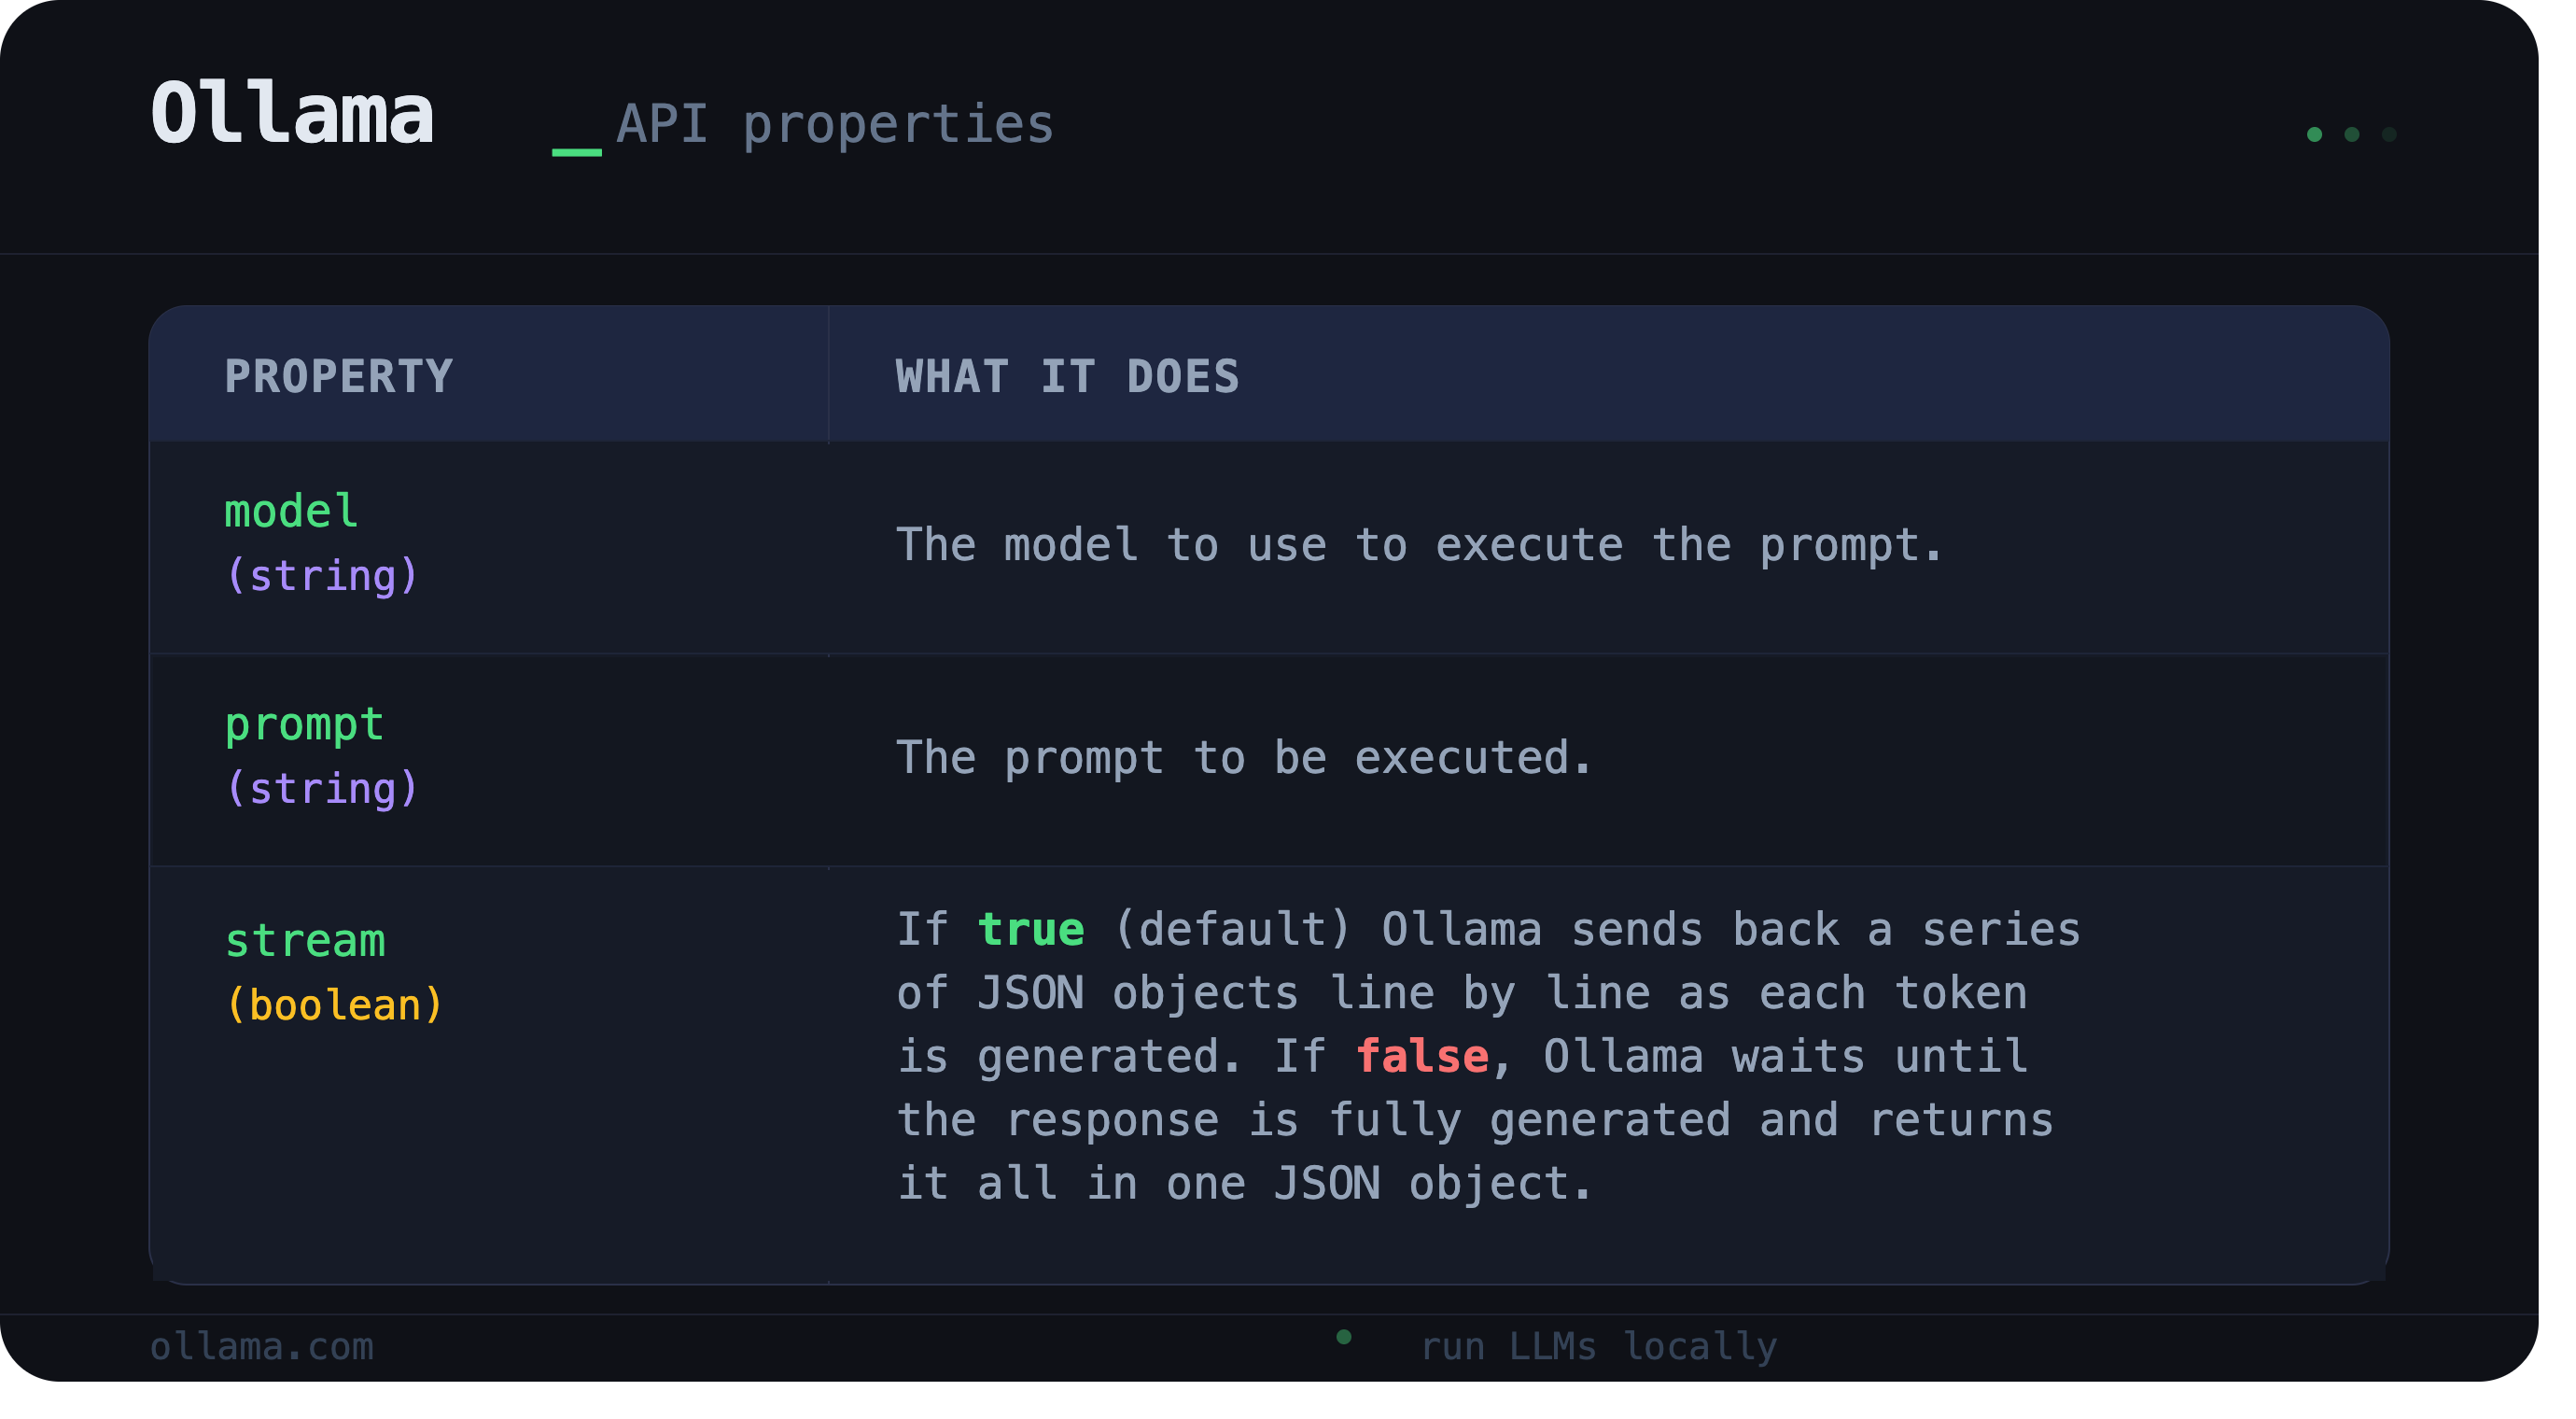
This curl will send the same prompt we sent, using the Ollama CLI, earlier except this time we have to be a little more specific in how we are asking Ollama to perform our command. The following table defines each of the properties in the JSON body we are sending in the request:
Don't worry too much about the format of the response. We will be wiring this up to a harness in the next articles.
Turning on MLX
There's one last thing we need to do before moving on. The latest version (as of this writing) of Ollama is supposed to support Apple's MLX framework out of the box. But, I have found that is not always the case. To turn it on, add the OLLAMA_USE_MLX variable to the EnvironmentVariables dictionary in the plist (see Configuring Ollama with Environment Variables):
<key>OLLAMA_USE_MLX</key>
<string>1</string>
Then restart the service:
brew services restart ollama
This will ensure you are taking advantage of Apple's unified memory model.
Common Ollama Commands
Ok, at this point Ollama is set up and ready for you to use. There are two ways to issue commands to an Ollama instance. There are CLI commands like the pull and run commands you saw earlier. And there are API commands like the curl tags request to see the available models.
CLI Commands
You run CLI commands directly on the AI Machine, in a terminal. These are for managing the models and the service itself. Here are the ones you will use most:
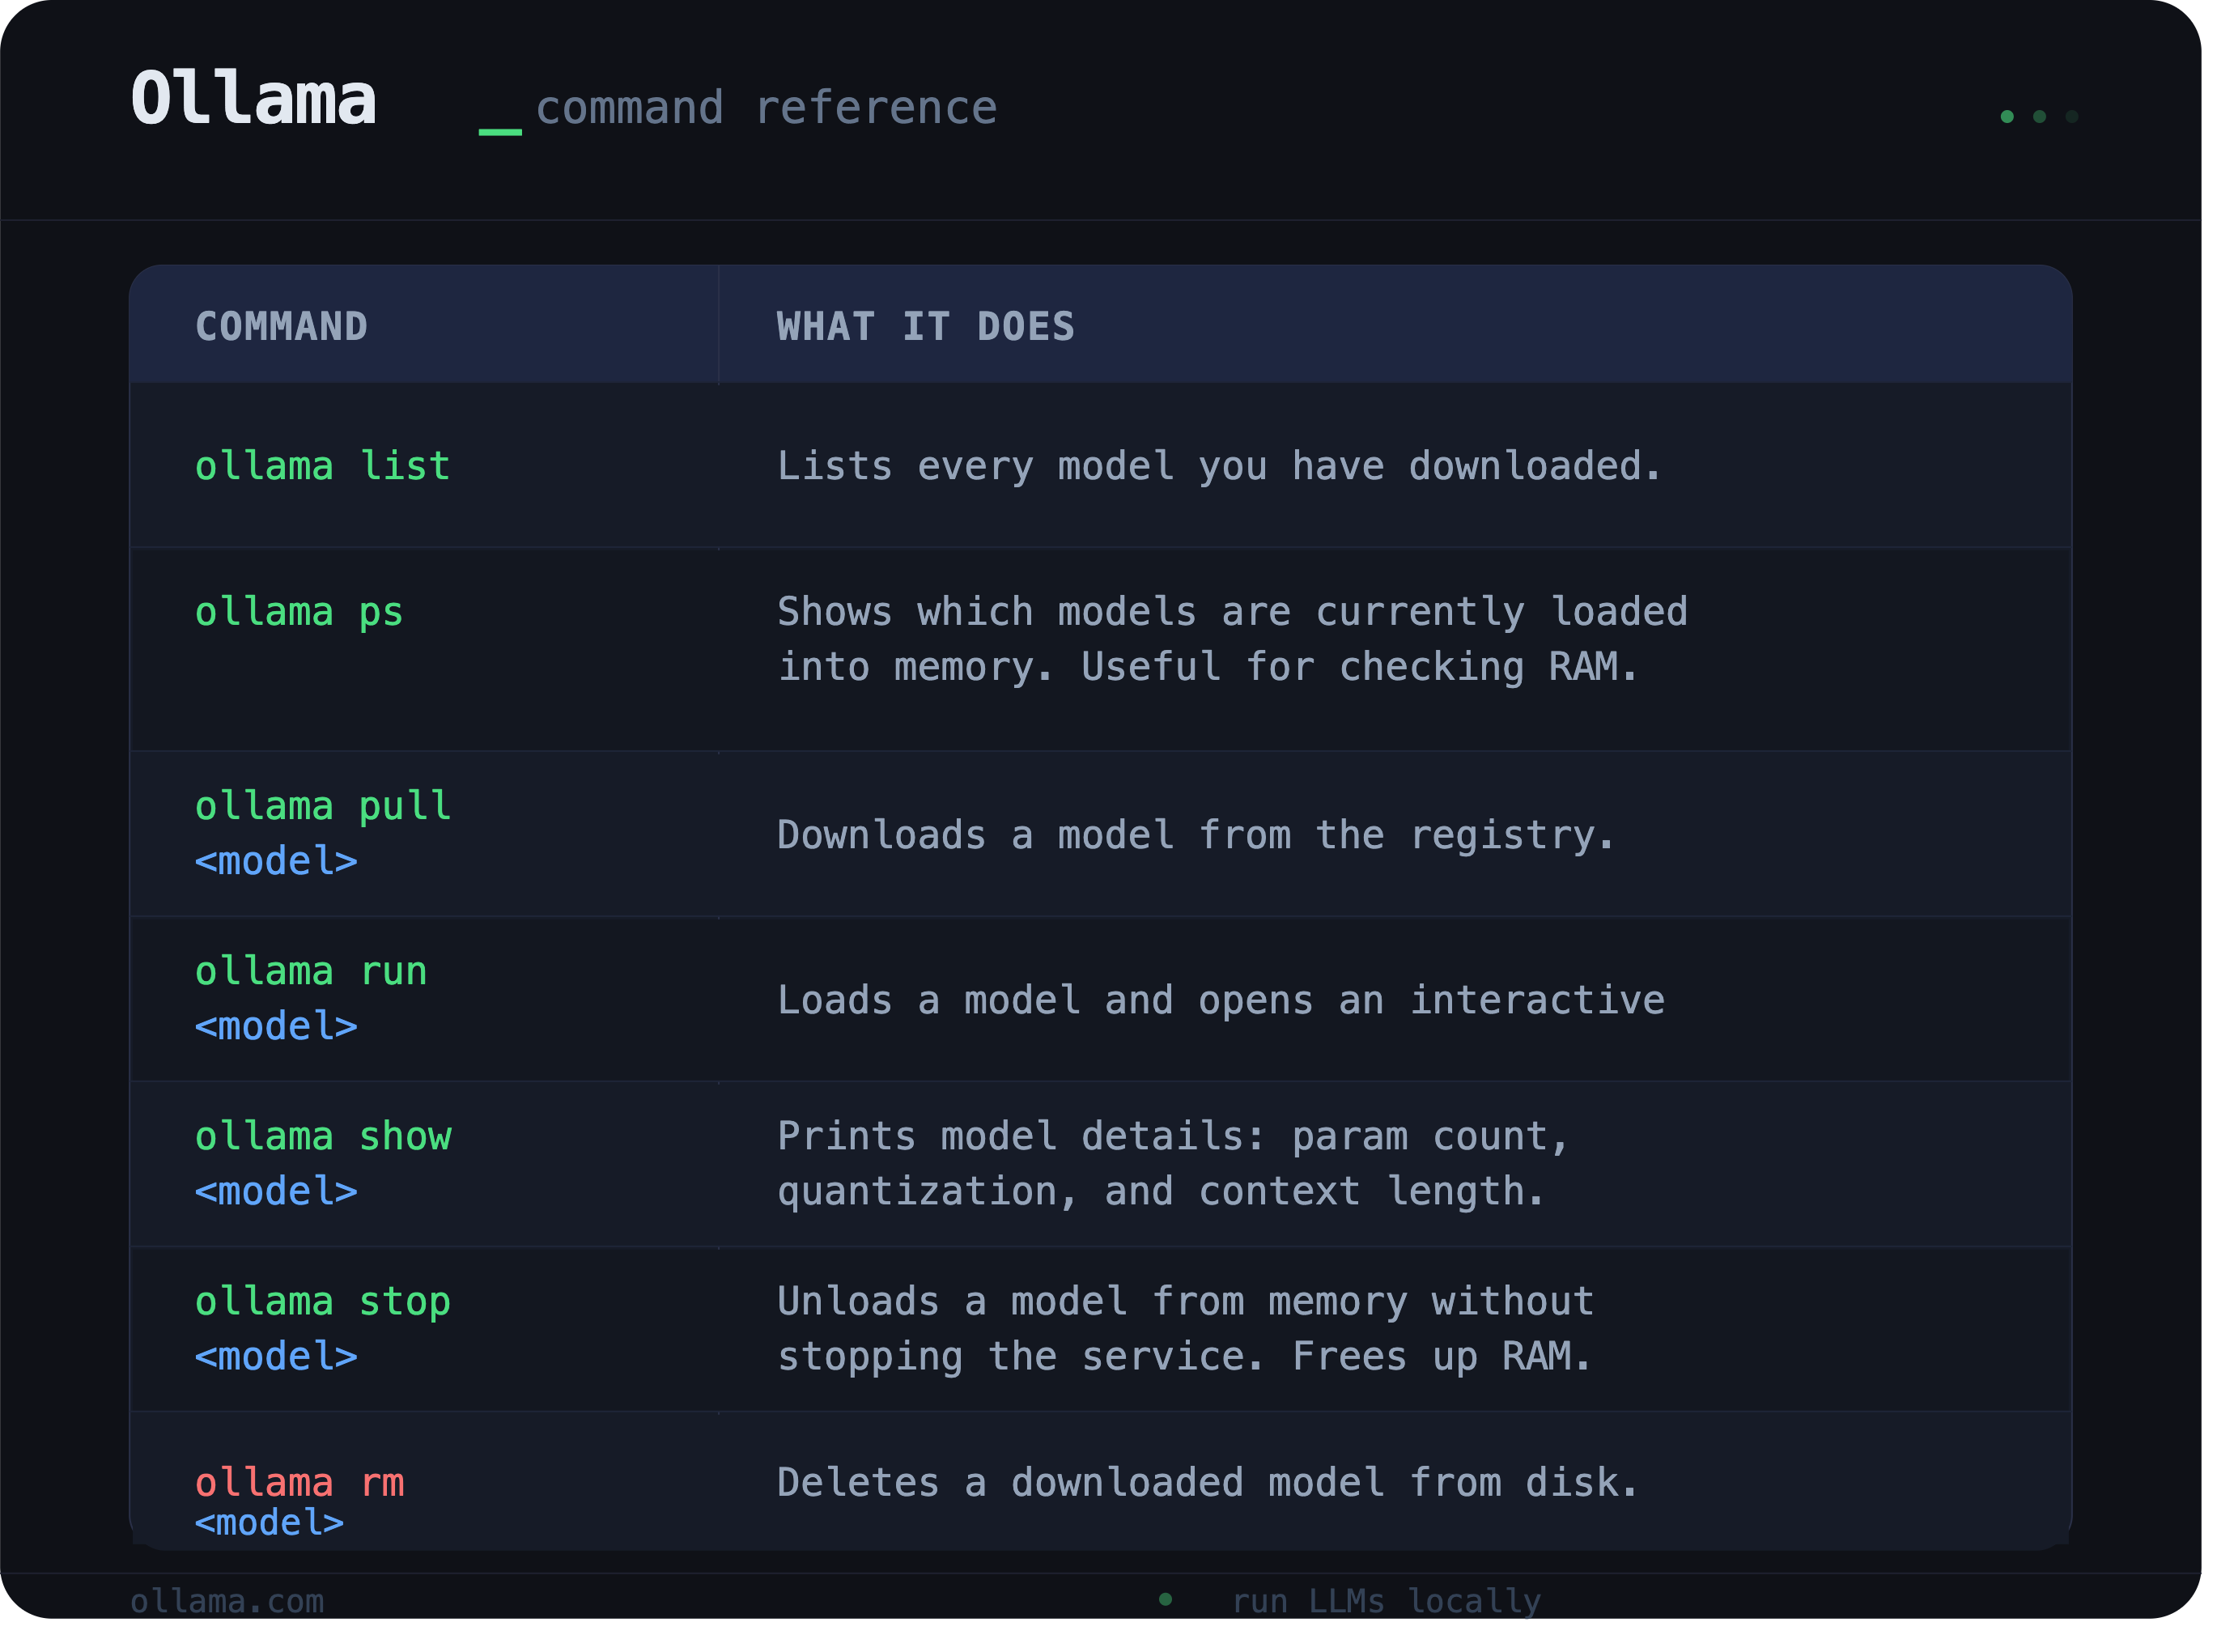
For example, to confirm your model is installed and see how it was quantized:
ollama show qwen3-coder:30bNote: you must be on the AI Machine to run these commands.
API Commands
The API is how remote clients talk to Ollama. It is the whole reason we exposed the server on the LAN. Anything you can do in the CLI, a program on another machine can do over HTTP. The examples below use the AI Machine's IP address (10.0.0.123) and port (11434) from earlier. Replace the IP with your own.
Ollama exposes two API surfaces: its native API and an OpenAI-compatible API.
Ollama API Commands
This is Ollama's own API. List the available models (the same request you used to verify connectivity):
curl http://10.0.0.123:11434/api/tags
See which models are loaded into memory right now:
curl http://10.0.0.123:11434/api/ps
Send a chat message and get a single, complete response back. Set "stream": false so the reply arrives as one JSON object instead of a stream of tokens:
curl http://10.0.0.123:11434/api/chat -d '{
  "model": "qwen3-coder:30b",
  "messages": [
    { "role": "user", "content": "Write a Swift async networking client." }
  ],
  "stream": false
}'
OpenAI API Commands
Ollama also exposes an OpenAI-compatible endpoint at /v1. This is the important one. Many existing tools and libraries are built to talk to OpenAI's API. Because Ollama mirrors that format, you can point those tools at your local server instead of OpenAI's cloud (usually by changing one base URL), and they keep working against your local model.
The OpenAI-compatible version of the chat request above looks like this:
curl http://10.0.0.123:11434/v1/chat/completions -d '{
  "model": "qwen3-coder:30b",
  "messages": [
    { "role": "user", "content": "Write a Swift async networking client." }
  ]
}'
The endpoint path (/v1/chat/completions) and the response shape match OpenAI's. That compatibility is what makes it possible to slot a local model into a development workflow built around cloud tools, which is exactly where this series is headed.
Up next
With Ollama up and running and a solid understanding of how to serve local models, we're ready to build a fully local development environment.
In the next article, we'll dive into Ollama Modelfiles. Modelfiles let you create purpose-built model configurations, giving you control over things like the system prompt, context window, and how creatively the model responds
If you hit any snags along the way, leave a comment below. The AI and LLM ecosystem moves fast, so some details may have changed between the writing of this article and your reading of it.